
Archive for the ‘Misc’ Category
Protected: How to Setup ownCloud 5 on Ubuntu 13.04
Posted: July 8, 2013 in Misc, Personal, RedhatTags: Owncloud
Allow New VLAN for fujitsu blade and Cisco core switch
Posted: June 20, 2013 in CISCO, MiscTags: fujitsu blade, vlan
1
1 – Allow the vlan to the physical interface on Cisco core switch ( Find out what ports and port channel are use for uplink from Blade switch ) ( eg gi3/45,gi4/45,gi5/45 )
– switchport trunk allowed vlan add XXX
-Add it to the port-channel that the interface is in (same command as above)
2 – Create the VLAN on blade switch ( if not already exists ). Exam ple below to add vlan 110 :
– (AUGS-PCHAS02-SW07)#conf
(AUGS-PCHAS02-SW07)(Config)#vlan dat
(AUGS-PCHAS02-SW07)(Vlan)#vlan 110
(AUGS-PCHAS02-SW07)(Vlan)#vlan name 110 User110
(AUGS-PCHAS02-SW07)(Vlan)#exit
3 – Allow the VLAN on interface range
-(AUGS-PCHAS02-SW07)(Config)#int range 0/1 – 0/48
(AUGS-PCHAS02-SW07)(if-range)#sw allowed vlan add 110
(AUGS-PCHAS02-SW07)(if-range)#sw tagg 110
(AUGS-PCHAS02-SW07)(if-range)#exit
4 – Allow and tag the vlan on port channel .
(AUGS-PCHAS02-SW07)(Config)#int 1/1
(AUGS-PCHAS02-SW07)(Interface AUGS-PCHAS02-SW07/1/1)#sw allowed vlan add 110
(AUGS-PCHAS02-SW07)(Interface AUGS-PCHAS02-SW07/1/1)#sw tagg 110
(AUGS-PCHAS02-SW07)(Interface AUGS-PCHAS02-SW07/1/1)#exit
(AUGS-PCHAS02-SW07)(Config)#exit
5- Copy the config
–
(AUGS-PCHAS02-SW07)#copy run start
Configuration Saved!
Product:
CLARiiON CX4
Unisphere Service Manager
Description:
How to Collect SPCollects via Unisphere
Resolution:
To collect the SPCollects via the Unishere GUI, follow these steps:
1. Log in to the CLARiiON via Unisphere.
2. On the Dashboard screen, select the CLARiiON system you wish to generate SPCollects from.
3. On the System Information screen there is a Task panel containing SPA Tasks and SPB Tasks.
4. To generate SPCollects for SPA:
1. Select Generate Diagnostic Files from the SPA Tasks panel.
2. A confirmation window will appear, select Yes to start the SPCollect script now.
3. Click OK to confirm the task successfully starts.
5. The SPCollect script may take several minutes to complete. To verify the SPCollect creation for SPA:
1. Select Get Diagnostic Files from the SPA Tasks panel.
2. The SPA File Transfer Manager window will appear.
3. Enlarge the SPA File Transfer Manager window and resize the Files On SP panel for easier browsing.
4. Click twice on the Date column in the Files On SP panel to show the most recently created files first. Enlarge the Name column so that the full file names can be read.
5. If the SPCollect script is still running, you will see a file of the format {SERIAL NO}_SPx_YYYY-MM-DD_HH_MM_SS_runlog.txt which corresponds to the array serial number, SP id and the date and time (GMT) that the SPCollect script was started on the SP.
6. Wait a few minutes and click on Refresh to update the Files On SP display.
7. When the SPCollect script has completed the Files On SP panel will show a file of the format {SERIAL NO}_SPx_YYYY-MM-DD_HH_MM_SS_xxxxx_data.zip which corresponds to the array serial number, SP id and the date and time (GMT) that the SPCollect script was started on the SP.
6. To retrieve the SPCollects from SPA:
1. In the SPA File Transfer Manager window from step 5 above, click on the required SPCollect zip file in the Files On SP panel.
2. In the Destination Directory panel, select the destination directory on the local host that the SPCollect should be transferred to.
3. Click on the Transfer button at the bottom of the File On SP panel to begin the file transfer operation.
4. A confirmation window will appear, select Yes to start the transfer operation.
5. The Transfer Status panel will report the results of the file transfer operation.
6. Click OK to close the SPA File Transfer Manager window and return the System Management screen.
7. Repeat Steps 4 to 6 to generate and retrieve SPCollects for SPB.
Very Good post from http://geekyprojects.com on clonezilla . Nice step by step guide which helped me a lot .
Ref : http://geekyprojects.com/cloning/how-to-use-clonezilla-tutorial/
=================================================
In past I have written articles describing differences between Clonezilla SE and CLonezilla Live and how to setup a Clonezilla server. However, many people kept asking me for instructions on how to use Clonezilla. That is why I decided to write this tutorial. For those of you not familiar with Clonezilla, it is a free disk cloning utility that will let you image hard drives via a USB or Ethernet connection. In this tutorial we are going to be using Clonezilla Live to clone a computer’s internal hard drive to a USB external drive. The instructions, however,0 should be pretty much the same for Clonezilla Server Edition. As opposite to other Clonezilla tutorials on the web, I have tried to make this tutorial as detailed as possible, including instructions for “saving” as well as “restoring” the image. Do not be scared by the length of the article; this is actually a walkthrough, so it should be very easy for everybody to understand.
Download Clonezilla Live, burn the iso image (you can use the free Imgburn for this) and boot the computer from the CD. As I previously stated, for those of you using Clonezilla Server the instructions should be pretty much the same, except that instead of booting from a LiveCD, you will be booting from the network connecting to a Clonezilla server which will store your image. The server will provide the Clonezilla wizard via the network connection.
Most of the items in this tutorial are self explanatory, but I will go through all of them in case of doubts in any particular step.
Saving the Image
Insert the liveCD in you CD-ROM and boot from it.
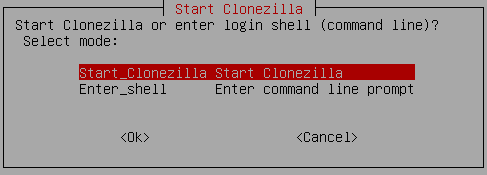
1) At the first screen just click enter.

2) Next, choose your language.

3) Choose the way your keyboard is laid out. If you are in North America just click enter. If you are not in North America your keyboard most likely has a different layout than the default chosen by Clonezilla. Choose the one that pertains to your country.

4) If your “destination” drive is already partitioned and formated in a filesystem Linux understands (e.g. Ext2, Ext3, Ext4, Fat32, etc.), choose “Start_Clonezilla“. If it is not, then click “Enter_shell” and format it. Make sure you identify the drive properly before formatting it, otherwise you can format the wrong one and lose your data. When done, type “ocs-live” to return to the Clonezilla wizard.
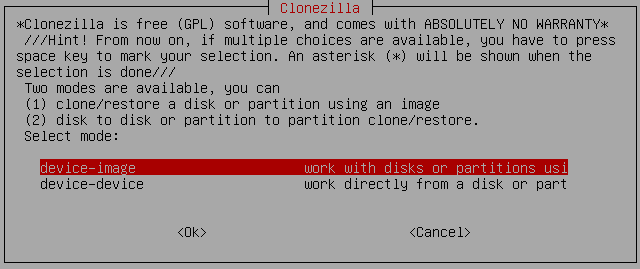
5) For this tutorial we are going to make an “image“. Images are compressed files not designed to be accessible, they are meant to be stored away for later use. So, we are going to choose “device-image“. The next option “device-device” as its name indicates, is used when you want to clone two hard drives in one step without creating an image.
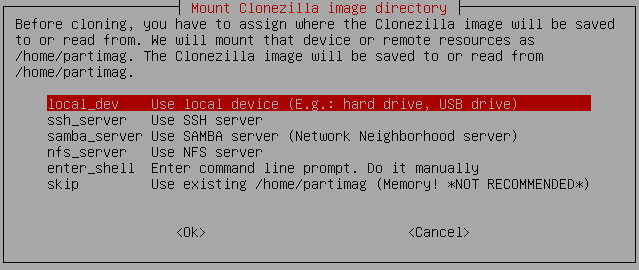
6) Select the destination location. This is where you are going to save your image to. For this tutorial, we are going to be choosing the first option “local_dev“. However, if you do not have a USB drive available, notice that you can also save the image to a wide variety of shared drives on your network.
7) Next, Clonezilla will try to detect your USB drive. Connect the USB drive when Clonezilla asks you to do so, then wait a few seconds to give Linux time to recognize the drive and click enter to continue.
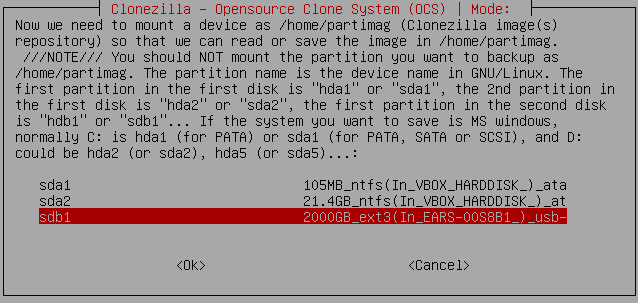
8) Select the destination drive. This is the drive you are going to be saving your image to. If your USB hard drive did not get detected on the previous step and it is not appearing on the list, appears intermittently or just won’t format at all, read the section “Problematic Drives” in my article: How to Format a USB External Hard Drive for Linux.
9) Next, Clonezilla will ask you for a directory in your destination drive, where you would like to save your image to. If your destination drive is empty (like the one in the picture below), just choose “Top_directory_in_the_local_device“.

10) To shorten the steps needed to finish, choose “Beginner“. If you have limited space on your destination drive and want to choose a more suitable compression method, other than the default chosen by Clonezilla, choose “Expert”. Expert mode also lets you modify other settings which are useful whenever you have trouble during the cloning process.

11) For this tutorial choose “savedisk“. This will make an image of the entire “source” hard drive. If you wish to make an image of only one partition, choose “saveparts“.

12) Type the name you wish to have for your image; I usually make it the model of the computer and the date, for example: toshiba-satellite-02-27-11, but this is entirely up to you.

13) Choose the “source” drive. This is the hard drive you wish to clone. Move up and down the list using the arrows on your keyboard to the desired drive and then click on the space bar to select it.

14) Make sure everything looks good and click “enter” to continue.
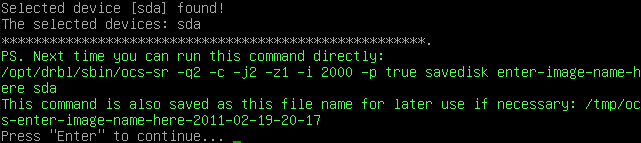
15) Again make sure everything looks good, type “y” and click “enter” to start the imaging process.

Restoring the Image
To restore the image, follow steps 1 through 10 on the previous section of this tutorial.
11) Choose “restore_disk“. If you previously backed up a partition instead of an entire drive, choose “restoreparts”.
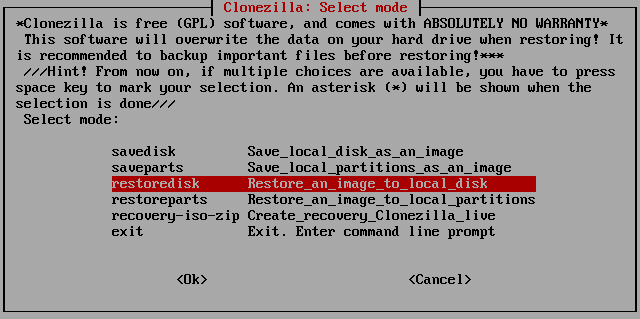
12) Choose the image you would like to restore.

13) Choose the “destination“. This is the drive where you will be extracting the image to. Make sure it is empty, since all its contents will be erased.

14) Finally, Clonezilla will ask you twice if you would like to start the process. If you are sure the destination drive is empty, choose yes to start the process.

How to run detect_bottlenecks on the RecoverPoint Appliances.
Posted: September 8, 2011 in MiscTags: Recovary Point
Fix You will need to log the output with PuTTY or a similar application.
- Log into the floating IP as admin (password: admin).
- Run the command detect_bottlenecks and answer the prompts as followsLocal-171> detect_bottlenecks
Enter mode (select one from the list), or press Enter to default mode (default is System overview and bottleneck analysis)
1) System overview and bottleneck analysis
2) Detection of initialization periods
3) Detection of high load periods
4) General detection including initialization and high load periods with peak writing analysisSelect, or press ‘ENTER’: 4
Enter earliest time, or press ‘ENTER’ for the earliest time available
(Format: HH:MM [DD/MM/YYYY] OR wks/days/hrs/mins ago)Enter latest time, or press ‘ENTER’ for the latest time available
(Format: HH:MM [DD/MM/YYYY] OR wks/days/hrs/mins ago)Do you want advanced overview? (default is no)
1) yes
2) noSelect, or press ‘ENTER’: 1
Type of overview? (default is normal)1) normal
2) detailedSelect, or press ‘ENTER’: 2
Enter peak_duration(secs/mins/hrs),e.g I/O peaks (default is 5 minutes)Enter group name(s), separated by ‘,’ if more than one (default is all groups)
Warning: This operation may take a long time. Do you want to continue(y/n)?y
- Forward output of command to EMC RecoverPoint Technical support for analysis.
- After running the bottleneck command in CLI, download the output file ” bottlenecks.csv ” using a web browser:
http://<rpa_ip_address>/info – user webdownload, password webdownload
Note This feature returns extensive statistics about RecoverPoint system performance, by group, RPA (“box”), and site. The quantity and type of statistics depends on the filters specified in the CLI detect_bottlenecks command.
The standard output includes the following set of statistics:
- WAN throughput
- Total incoming data rate
- Initialization (synchronization) output rate
- CPU utilization
- Compression ratio
- Percentage of time in transfer (group only)
- Percentage of time in initialization (group only
Source : EMC Support Engineer
$ sqlplus “/ as sysdba”
SQL> select * from v$version;
SQL> exit
Here is some sample output from 11g Standard Edition:
BANNER
——————————————————————————–
Oracle Database 11g Release 11.2.0.1.0 – 64bit Production
PL/SQL Release 11.2.0.1.0 – Production
CORE 11.2.0.1.0 Production
TNS for Linux: Version 11.2.0.1.0 – Production
NLSRTL Version 11.2.0.1.0 – Production
What is the difference between the Enterprise, Standard and Personal Editions of Oracle?
Submitted by admin on Sat, 2005-10-15 04:19
Oracle Enterprise Edition:
Enterprise Edition is the full (top of the range) version or the Oracle Database Server. Options like RAC, Partitioning, Spatial, etc. can be purchased separately to enhance the functionality of the database.
Oracle Standard Edition:
Standard Edition is designed for smaller businesses and enterprises. It offers a subset of the features/ functionality implemented in Enterprise Edition. Database options like Data Guard, Partitioning, Spatial, etc. is not available with Standard Edition (from 10g one can use RAC with Standard Edition). Standard Edition can only be licensed on servers with a maximum capacity of four processors.
Oracle Standard Edition One:
Standard Edition One is a low cost, entry-level version of the Oracle Standard Edition database server. Standard Edition One can only be licensed on small servers with a maximum capacity of two processors.
Oracle Personal Edition:
Personal Oracle is a single user version of the database server. It is mostly the same as Enterprise Edition, but doesn’t support advanced options like RAC, Streams, XMLDB, etc.
Oracle Lite:
Oracle Light is a database engine that can be used on mobile platforms like cell phones and PDA’s.
Oracle XE:
Express Edition (XE) is a free, downloadable version of the Oracle database server. Oracle XE can only be used on single processor machines. It can only manage up to 4 GB of data and 1 GB of memory. ISVs can embed XE in 3rd party products and redistribute it freely.
How to collect Log from Brocade B-Series Switch
Posted: June 24, 2011 in MiscTags: Brocade, Log, san
Got this from one of the EMC Engineer of how to collect Log for Brocade B-Series Switch . I am not a master of Brocade switching but this helps me out .
Goal How to collect logs from a Brocade B-Series switch from a Windows 2000 host with Hyperterminal or Putty
Goal How to use Hyperterminal.
Fact Product: Connectrix All Brocade B-Series switches
Fact OS: Microsoft Windows 2000
Fact OS: Microsoft Windows Server 2003
Fact OS: Microsoft Windows XP
Note Brocade B-Series: What logs and when to collect them from a Brocade switch, during normal and troubleshooting circumstances. emc93016
Note Brocade B-Series: How to collect a logs from a Brocade B-Series switch from a UNIX host. emc10350
Fix
For FOS version 4.4.x and above, the supportsave output is required for support issue’s. To collect the supportsave outputs you need to have an ftp service running on a separate host.
For FOS version below 4.4.x, collect the supportshow output.
Supportsave via IP:
- Start the program hyperterminal (Start Programs > Accessories > Communications > Hyperterminal).
- Make a new connection and pick a name for connection and an icon.
- A box appears with title “Connect to”. Change the connect using modem to TCP/IP (Winsock), then enter IP address of Brocade switch. Click OK button.
- Login into Brocade switch (default user: admin default password: password).
- Run command supportsave. Enter the IP address were the ftp server is running. It will report on the screen that it is collecting the RASLOG, TRACE and SUPPORTSHOW. After command completes.
- Type quit and close hyperterminal.
Alternative to Hyperterminal is to use the Free windows Tool PuTTY
- Start the standalone Putty application
- Select SSH or Telnet as the connection type and put in the IP of the Brocade switch.
- Hit connect and you will be presented with a prompt for login, you may have to approve connection if this is your first time connecting.
- Login to the Brocade switch using your credentials.
- Run command supportsave. Follow prompts to enter IP o the FTP server.
- Exit putty session by typing quit, gather logs from FTP location.
Supportsave via serial cable:
- Start the program hyperterminal (Start Programs > Accessories > Communications > Hyperterminal).
- Make a new connection and pick a name for connection and an icon.
- A box appears with title “Connect to”. Change the connect using com 1 or com 2 (depending were the serial cable is connected to.). Click OK button.
- Change the com1 or com2 properties to “default”.
- Login into Brocade switch (default user: admin default password: password)
- Run command supportsave. Enter the IP address were the ftp server is running. It will report on the screen that it is collecting the RASLOG, TRACE and SUPPORTSHOW. After command completes.
- Type quit and close hyperterminal.
Supportshow via IP:
- Start the program hyperterminal (Start Programs > Accessories > Communications > Hyperterminal).
- Make a new connection and pick a name for connection and an icon.
- A box appears with title “Connect to”. Change the connect using modem to TCP/IP (Winsock), then enter IP address of Brocade switch. Click OK button.
- Login into Brocade switch (default user: admin default password: password), then start capture text (Transfer > Capture text > File C:\supportshow.txt).
- Run command supportshow. After command completes, stop capture text (Transfer > Capture text > Stop).
- Type quit and close hyperterminal.
Alternative to Hyperterminal is to use the Free windows Tool PuTTY
- Start the standalone Putty application
- Select SSH or Telnet as the connection type and put in the IP of the Brocade switch.
- On the left hand column, select ‘logging’ and on the right hand side choose ‘all session output’
- Name the log file (default is putty.log in the putty.exe directory’
- Hit connect and you will be presented with a prompt for login, you may have to approve connection if this is your first time connecting.
- Login to the Brocade switch using your credentials.
- Run command supportshow, the screen will output all supportshow information and will add it to the log file specified in step 4.
- Exit putty session by typing quit, gather log from selected location
Supportshow via serial cable:
- Start the program hyperterminal (Start Programs > Accessories > Communications > Hyperterminal).
- Make a new connection and pick a name for connection and an icon.
- A box appears with title “Connect to”. Change the connect using com 1 or com 2. Click OK button.
- Change the com1 properties to “default”.
- Login into Brocade switch (default user: admin default password: password), then start capture text (Transfer > Capture text > File C:\supportshow.txt).
- Run command supportshow. After command completes, stop capture text (Transfer > Capture text > Stop).
- Type quit and close hyperterminal.
Note
PuTTY can be used to collect logs but are not officially supported by or recommended by EMC.
Installing vCMA and VMware iPad app for remote vSphere management
Posted: March 21, 2011 in MiscTags: iPad, vCMA
This is a very nice post from Eric Siebert from his BLOG http://searchvmware.techtarget.com. Helped me a lot and might help you.
After considering the security implications of managing a VMware infrastructure with an iPad, it’s time to install vCenter Mobile Access (vCMA) and connect it to the vSphere Client for iPad.
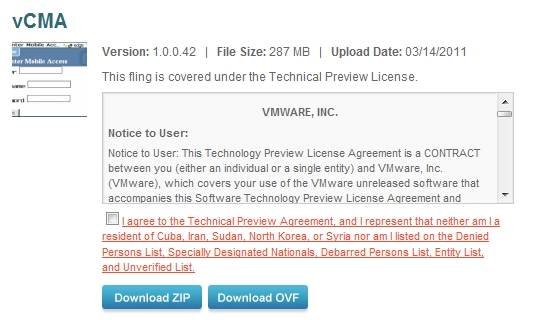
First, download the most recent copy of vCMA from the VMware Labs website. It’s available as either an Open Virtualization Format (OVF) file that can be imported into vCenter Server, or as a ZIP file with the virtual machine (VM) already deployed, which you can copy to a host and register. The OVF file is easier to install, so l will cover that method.
Download the OVF version to your workstation. It contains a small .ovf file and a 300 MB system.vmdk file.
Figure 1
(Click image for an enlarged view.)
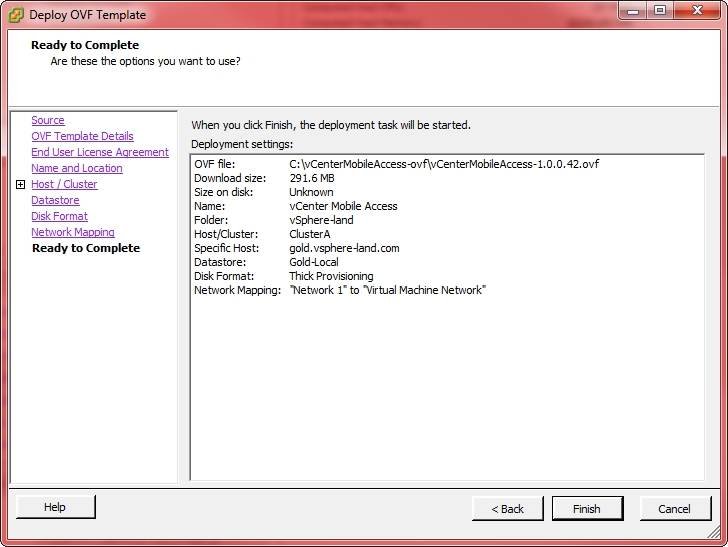
Unzip the file and connect to your vCenter Server with the vSphere Client. Select File, then Deploy OVF Template, which will launch a wizard. Step through the various screens by mostly accepting the default configurations. Also, choose a location for the VM and the virtual network where it will reside. The network must have access to your vCenter Server. If you want directly connect to your hosts, the network will also need access to your host management consoles.
Figure 2
(Click image for an enlarged view.)
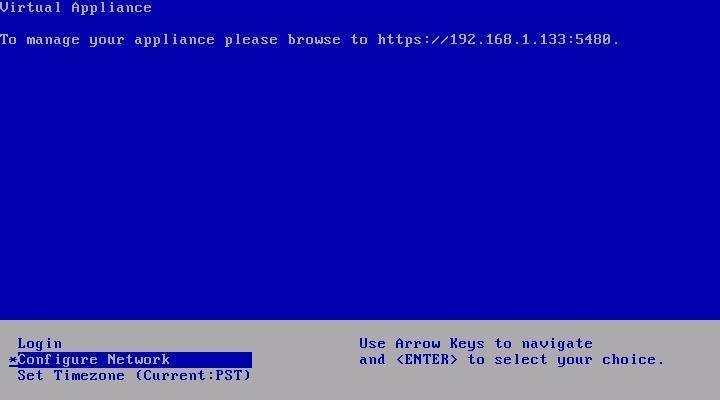
Once the vCMA is deployed, power on the newly created VM and open a console window. The vCMA appliance uses Dynamic Host Configuration (DHCP) by default. If no DHCP servers are available on the network, you must manually configure the IP information.
To manually configure the IP information, select Configure Network from inside the console window and enter the IP information when prompted.
Figure 3
(Click image for an enlarged view.)
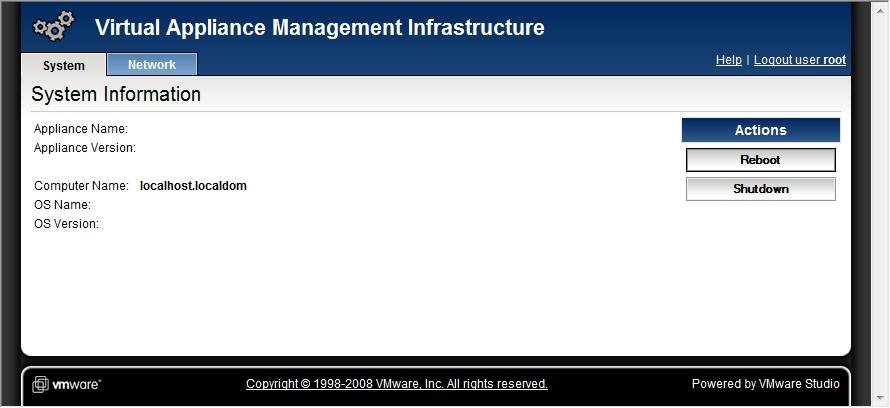
The following step is optional, and it’s only for managing some basic vCMA setup information through a Web browser (not to be confused with mobile browser user interface). The Web management user interface (UI) allows only basic tasks, such as rebooting the appliance or setting network information, which you can also perform with the command-line interface (CLI), so you won’t typically use it.
You will see a URL in the console window with a 5480 port number. Upon visiting the URL, you will be prompted for a username and password. The default username is root, and the default password is vmware. This account is for logging in
through the CLI console and the Web UI. Note that the management UI does not support Mozilla Firefox, and you will get a JavaScript error after logging in. You won’t be able to precede, so use Internet Explorer instead.
Figure 4
(Click image for an enlarged view.)
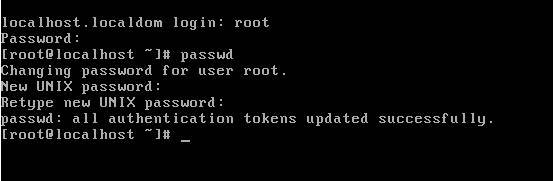
After you set the network information for the appliance, change the default password for the root account. Select Login from the CLI console window and log in using the username root and password vmware. Then type the command passwd and enter a new root password. Finally, type logout to end the session.
Figure 5
(Click image for an enlarged view.)
The vCMA appliance is now deployed. From any browser, you can access the mobile-browser interface by going to the IP address of the vCMA, followed by /vim (e.g., https://192.168.1.133/vim). Also, you must use HTTPS to connect, not HTTP.
From the vCMA login screen, you can enter any host or vCenter Server name or IP address, along with its login credentials. Once connected, you can use the basic mobile access administration functions. It’s formatted for mobile browsers, and its functionality is similar to the iPad app, with one exception: The mobile UI supports vMotion.
Figure 6
(Click image for an enlarged view.)
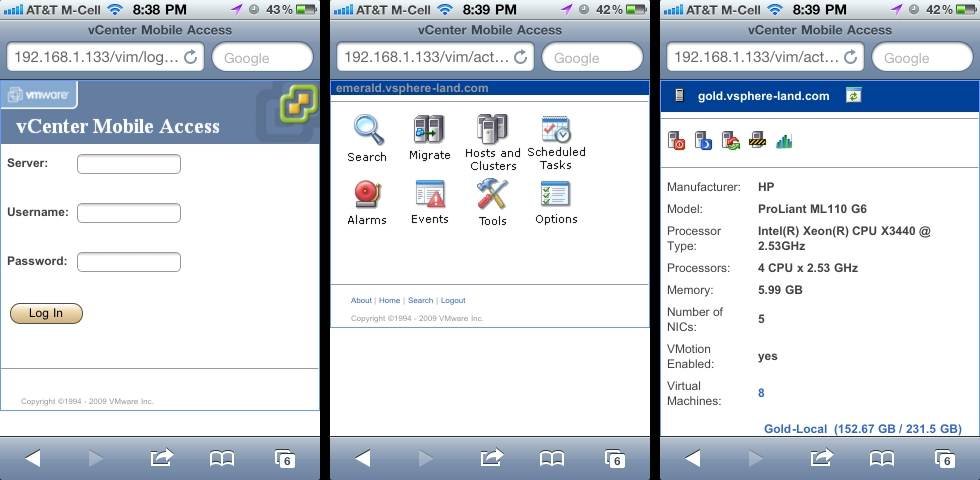
Figure 7
(Click image for an enlarged view.)

Connecting the VMware iPad app to vCMA
Now you are ready to connect vSphere Client for iPad to vCenter Mobile Access (vCMA).
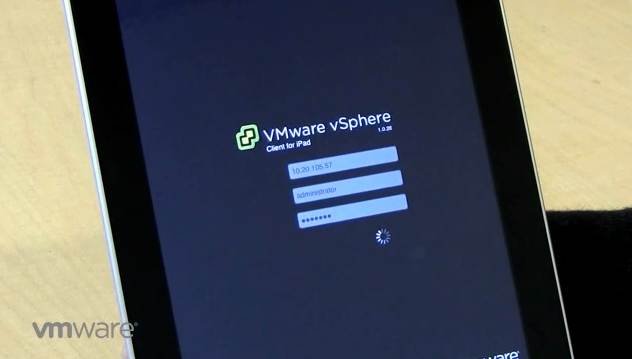
First, download the vSphere Client for iPad from Apple’s App Store. Once the VMware iPad app is installed, go the iPad’s settings. Scroll down and tap on vSphere Client. Next, enter vCMA’s IP address in the Web Server field.
Figure 8
(Click image for an enlarged view.)

Ensure that your iPad has connectivity to the vCMA virtual appliance, which may entail configuring the iPad’s built-in VPN client.
Launch the vSphere Client for iPad application and enter the host, username and password for a vCenter Server or vSphere host.
Figure 9
(Click image for an enlarged view.)
After you sign in, a certificate error will pop up. This error is just a warning that the SSL certificate is self-signed, and press Allow to continue. This message will appear every time you log in, unless you replace the self-signed certificate that’s included with the vCMA with a trusted SSL certificate (i.e., Verisign). Once connected, you can use the VMware iPad to manage your hosts and virtual machines, as seen below.
Figure 10
(Click image for an enlarged view.)
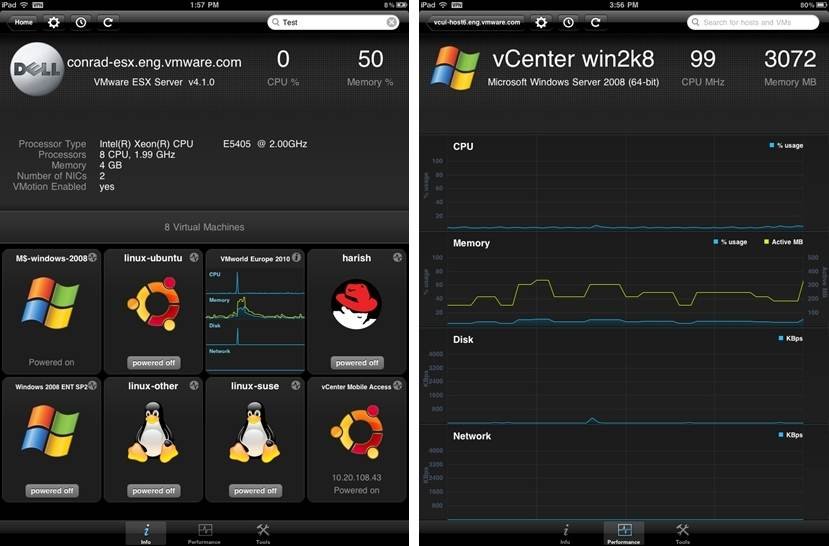
Figure 11
(Click image for an enlarged view.)

How to install Brage CM (Change Management) on Windows with XAMPP
Posted: July 14, 2010 in MiscTags: brage, Change management, cm
Was trying to install Brage the open source CM(Change Management) today and found this nice post . All credit goes to “Jared Heinrichs”
Only Thing I want to add ” Please dont Forget to Apply the Fixes after Install ” I was basically not able to log in for the forst time without applying the Fixes. Download it from here and Read the Readme File for How to . It is very straing forward.
Download Brage v0.1.0-RC1-Fixes
Disclaimer
I am not going to go into how to secure your web server. This tutorial is going to be used for demonstrating how to get a Brage CM up and running. When ever there is a password I am going to use “password” as the password. I do this to make things easy. If you want to change things after the fact I highly recommend it!
Things to download
You are going to need to download these items:
- Download XAMPP
- Download Brage v0.1.0-RC1
- Download Brage v0.1.0-RC1-Fixes
- Download Adodb
- *Optional* Download 7-Zip
*Note * You are going to need to make sure you have a program like 7-zip in order to expand the Brage files.
Let’s install Brage CM
Step 1 – Install XAMPP
This process is a simple Next, Next, Next installer. Anyone familiar to Windows should have no issues with this. If you are running Vista or Windows 7 you will most likely want to install XAMPP to “C:\Users\User\xampp” directory instead of the default “C:\xampp” location. If you have the UAC on it will not let you install to the root of “C:” The rest of the tutorial I will assume you installed XAMPP to “C:\xampp”
Step 2 – Copy the Brage files
Copy the brage files to: “C:\xampp\htdocs\brage”. Once that is done you will also need to copy the contents of the “Fixes” to the same directory. When Windows asks to overwrite any file just say “Yes to all”.
Step 3 – Copy the Adodb files
You must copy the contents of Adodb file to: “C:\XAMPP\Adodb”. You will need to create the “Adodb” directory.
Step 4 – Install Pear extensions
XAMPP is pretty good at installing the most common PEAR extensions so I’ve never had to install them before. To install the needed extensions you must open a command prompt and make your way to the “C:\xampp\php” folder. You will need to type these commands in order to get everything all up and running:
- pear upgrade HTML_QuickForm – this will upgrade “HTML_QuickForm” & “HTML_Common”
- pear install HTML_QuickForm_Advmultiselect
Here’s the output from my command prompt

Step 6 – Edit “config.php”
You are going to need to create and edit Brage’s “config.php”. Go to “C:\xampp\htdocs\brage\include” and make a copy of “config.php.sample” and call it “config.php”. This file is the main config file for Brage.
** NOTE ** I have create a seperate post called “What the brage config file should look like”. If you copy it’s contents put it into “C:\xampp\htdocs\brage\include\config.php” you will not have to change anything!
For the rest of you that like to follow along and understand what to do here’s what I did:
Line 28 – Changed it to:
$conf['adodb'] = 'C:/xampp/Adodb/adodb.inc.php';
Line 45 – Changed it to:
$conf['smarty_path'] = 'C:/xampp/htdocs/brage/include/classes/Smarty/libs/';
Line 50 – Change it to:
$conf['smarty_templates_dir'] = 'C:/xampp/htdocs/brage/templates/';
Line 56 – Change it to:
$conf['smarty_compile_dir'] = 'C:/xampp/htdocs/brage/templates_c';
Line 61 – Change it to:
$conf['smarty_cache'] = 'C:/xampp/htdocs/brage/include/classes/Smarty/tmp/';
Line 65 – Change it to:
$conf['phpmailer_path'] = 'C:/xampp/htdocs/brage/include/classes/phpmailer/';
Line 71 – Change it to:
$conf['baseurl'] = 'http://localhost/brage/';
Lines 112-117 – Change it to:
$conf['dbtype'] = 'mysql';      # mysql, postgres, oracle etc..
$conf['dbhost'] = 'localhost';  # Hostname/IP of database server
$conf['dbname'] = 'brage';      # Database name
$conf['dbuser'] = 'brage';      # Database user
$conf['dbpass'] = 'password';   # Database password
$conf['dbport'] = '3306';       # Database port
Lines 151 – Change it to:
$conf['attachment_path'] = 'C:/xampp/htdocs/brage/attachments';
Step 7 – Create Folders
The last step we made the config file link to folder that didn’t exist yet. You must make sure that these folders exist.
- “C:\xampp\htdocs\brage\include\classes\Smarty\tmp”
Step 8 – Make a MySQL User and Database
There are several steps that you are going to need to do:
- Open a browser and go to: http://localhost/phpmyadmin/.
- Click on the “privileges” tab.
- Click “Add a new User” link.
-
Fill Out the form like so and hit go:

-
You should see something like this saying you are successful.

- You are going to need to import some items into the database to get Brage to work. Click on the “brage” database on the left hand side.
- Click on the “Import” tab at the top of the screen.
- Click Browse and select the file “C:\xampp\htdocs\brage\docs\brage.mysql”.
- Click “Go” button.
-
You will see a confirmation that everything went well. Also on the left hand side there should be quite a few items now listed.

Step 9 – Login to the Brage Program
Go to http://localhost/brage/ and you will see something like this:

Following the documenation it says that the default user info is:
- User = “admin”
- password = “dolphin”
You should now be able to login to your software!
** UPDATE **
You will need to download admin_user.php so that you can create new users. You must save this file to: “C:\xampp\htdocs\brage”. The original file had a bug in it.

From the root Console of Scalix , do the following
[root@Server|scalix]# sxdu -h | sort -nr | grep G | more
Hope this Helps.
