
Very Good post from http://geekyprojects.com on clonezilla . Nice step by step guide which helped me a lot .
Ref : http://geekyprojects.com/cloning/how-to-use-clonezilla-tutorial/
=================================================
In past I have written articles describing differences between Clonezilla SE and CLonezilla Live and how to setup a Clonezilla server. However, many people kept asking me for instructions on how to use Clonezilla. That is why I decided to write this tutorial. For those of you not familiar with Clonezilla, it is a free disk cloning utility that will let you image hard drives via a USB or Ethernet connection. In this tutorial we are going to be using Clonezilla Live to clone a computer’s internal hard drive to a USB external drive. The instructions, however,0 should be pretty much the same for Clonezilla Server Edition. As opposite to other Clonezilla tutorials on the web, I have tried to make this tutorial as detailed as possible, including instructions for “saving” as well as “restoring” the image. Do not be scared by the length of the article; this is actually a walkthrough, so it should be very easy for everybody to understand.
Download Clonezilla Live, burn the iso image (you can use the free Imgburn for this) and boot the computer from the CD. As I previously stated, for those of you using Clonezilla Server the instructions should be pretty much the same, except that instead of booting from a LiveCD, you will be booting from the network connecting to a Clonezilla server which will store your image. The server will provide the Clonezilla wizard via the network connection.
Most of the items in this tutorial are self explanatory, but I will go through all of them in case of doubts in any particular step.
Saving the Image
Insert the liveCD in you CD-ROM and boot from it.
1) At the first screen just click enter.

2) Next, choose your language.

3) Choose the way your keyboard is laid out. If you are in North America just click enter. If you are not in North America your keyboard most likely has a different layout than the default chosen by Clonezilla. Choose the one that pertains to your country.

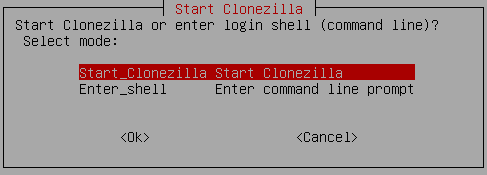
4) If your “destination” drive is already partitioned and formated in a filesystem Linux understands (e.g. Ext2, Ext3, Ext4, Fat32, etc.), choose “Start_Clonezilla“. If it is not, then click “Enter_shell” and format it. Make sure you identify the drive properly before formatting it, otherwise you can format the wrong one and lose your data. When done, type “ocs-live” to return to the Clonezilla wizard.
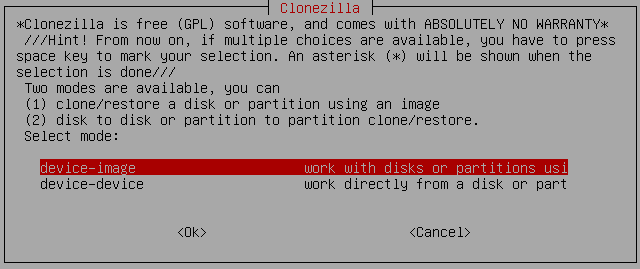
5) For this tutorial we are going to make an “image“. Images are compressed files not designed to be accessible, they are meant to be stored away for later use. So, we are going to choose “device-image“. The next option “device-device” as its name indicates, is used when you want to clone two hard drives in one step without creating an image.
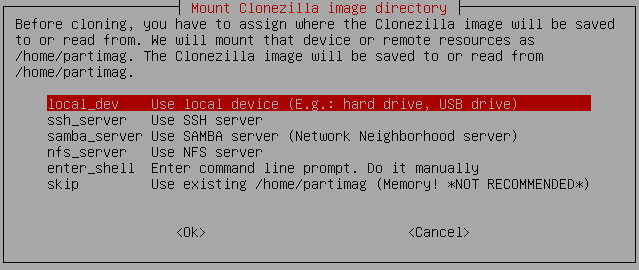
6) Select the destination location. This is where you are going to save your image to. For this tutorial, we are going to be choosing the first option “local_dev“. However, if you do not have a USB drive available, notice that you can also save the image to a wide variety of shared drives on your network.
7) Next, Clonezilla will try to detect your USB drive. Connect the USB drive when Clonezilla asks you to do so, then wait a few seconds to give Linux time to recognize the drive and click enter to continue.
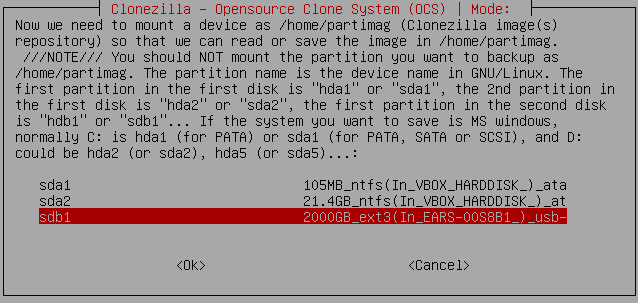
8) Select the destination drive. This is the drive you are going to be saving your image to. If your USB hard drive did not get detected on the previous step and it is not appearing on the list, appears intermittently or just won’t format at all, read the section “Problematic Drives” in my article: How to Format a USB External Hard Drive for Linux.
9) Next, Clonezilla will ask you for a directory in your destination drive, where you would like to save your image to. If your destination drive is empty (like the one in the picture below), just choose “Top_directory_in_the_local_device“.

10) To shorten the steps needed to finish, choose “Beginner“. If you have limited space on your destination drive and want to choose a more suitable compression method, other than the default chosen by Clonezilla, choose “Expert”. Expert mode also lets you modify other settings which are useful whenever you have trouble during the cloning process.

11) For this tutorial choose “savedisk“. This will make an image of the entire “source” hard drive. If you wish to make an image of only one partition, choose “saveparts“.

12) Type the name you wish to have for your image; I usually make it the model of the computer and the date, for example: toshiba-satellite-02-27-11, but this is entirely up to you.

13) Choose the “source” drive. This is the hard drive you wish to clone. Move up and down the list using the arrows on your keyboard to the desired drive and then click on the space bar to select it.

14) Make sure everything looks good and click “enter” to continue.
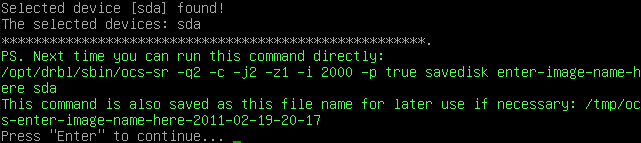
15) Again make sure everything looks good, type “y” and click “enter” to start the imaging process.

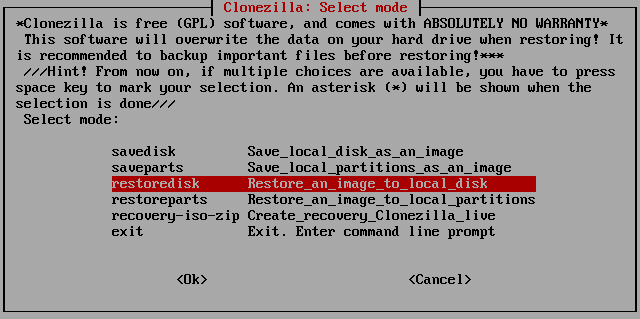
Restoring the Image
To restore the image, follow steps 1 through 10 on the previous section of this tutorial.
11) Choose “restore_disk“. If you previously backed up a partition instead of an entire drive, choose “restoreparts”.
12) Choose the image you would like to restore.

13) Choose the “destination“. This is the drive where you will be extracting the image to. Make sure it is empty, since all its contents will be erased.

14) Finally, Clonezilla will ask you twice if you would like to start the process. If you are sure the destination drive is empty, choose yes to start the process.


First of all I would like to say awesome blog!
I had a quick question that I’d like to ask if you do not mind. I was curious to know how you center yourself and clear your thoughts prior to writing. I’ve had a hard time clearing my mind in getting my thoughts out.
I truly do take pleasure in writing however it just
seems like the first 10 to 15 minutes tend to be lost simply just
trying to figure out how to begin. Any ideas or hints? Thank you!
Fantastic beat ! I wish to apprentice at the same time as you amend your website, how can
i subscribe for a blog site? The account aided me
a applicable deal. I were tiny bit familiar of this your broadcast offered shiny clear concept